Monday, December 4, 2017

Mulberrries and Jelly

Mulberries come at a bad time in the Lower Moutere on the lifestyle block. They ripen at the end of November, just as everything is piling on in for the end of the year.
This year I was determined to be prepared.
They also don't ripen all at once so gathering enough for some jelly can take awhile. I laid out a plastic sheet under our mulberry tree and every day went and collected the ripe fruit that fell and then picked off any ripe ones hanging on the tree.


Over several days I gathered several cupfuls - enough to make a small batch of jelly.
However that busy time of year got the better of me and the fruit I had left to ripen in the basket, went too far in the heat. I had to give a 1/3 of the fruit to the chickens as it had developed mould.
Everything on the internet says mulberry jelly or jam doesn't have high pectin so won't set well unless pectin is added.
I decided to add apple as the pectin addition. I did half and half apple to mulberries.
I covered them with water and boiled them until the colour (and flavour) had been extracted from the mulberries and the apples were soft.
I then filtered the mixture through some muslin to retrieve just the red coloured liquid.
Once the fruit had let go all their juice, it was back on the stove.
Once it was boiling, I added in a 1/4 less sugar than the amount of liquid I had.
Stirred until the sugar dissolved and then boiled it until it reached 105C.
The jelly became a beautiful red colour and I poured it into sterilised jars.
The flavour is not strong and the apple complements it nicely.
My jelly could be set firmer with additional pectin but being less firm, the kids can't go through it as quickly on their toast.
This season's preserving is underway. The loquats are back next.

Tuesday, November 14, 2017

Spring is elderflower cordial

The last few weeks has seen the elderflower shrubs come out in thousands of teeny white flowers.
The taste of spring is elderflower cordial.

The branches are quite springy so you can pull them down to pick the flowers and let them ping back.
We collect about 20 or so stalks of flowers that usually have several separate groups of flowers on the stalk.
Back in the kitchen we use the flowers to make elderflower cordial.
It also requires 3 lemons from the garden, water and sugar.

Elderflower cordial
20 -25 stalks of flowers.
3 lemons
1.5 litres of boiling water
750g - 1 kg sugar

Snap off the longer stalks to leave all the little groups of flowers in a bowl.
Use a potato peeler to create strips of lemon zest from three lemons and place into the same bowl. (Keep the lemons for the next day.)
Pour the boiling water over the flowers and lemons. Push the flowers under the water and leave it overnight. It does not smell very nice - quite vegetative.
The next day strain the mixture through some muslin to collect the mustard green liquid in a pot.
Gently heat the liquid and then as it starts to steam and bubbles are rising from the bottom of the pot add the strained lemon juice of the three lemons and the sugar. I use up to 1kg of sugar but it is worth tasting and checking as you go by mixing some of the concentrated cordial with water in a 1 to 3 ratio. We have found if looking to drink it mixed with soda water rather than normal flat water, it needs to be a little more sweet. The liquid changes to a more golden colour from the green.
Once the sugar has all dissolved and the cordial has been gently brought to the boil, pour into sterilised jars - that don't last very long.
Mix cordial with either water or soda water in a 1 to 3 ratio. Perfect after a hot afternoon in the garden.

You can also make Elderflower Collins cocktails:
1 shot of gin (or 2 if you prefer)
1 shot of elderflower cordial concentrate
Shake with ice, pour into the glass and top up with soda water.

The one problem with being eager elderflower cordial drinkers is that so far we haven't had enough elderberries ripen to make jelly.


Tuesday, October 31, 2017

Eating through the hunger gap

This year I have been more successful in having vegetables from the garden during the supposed 'hunger gap' than during the winter.
I have a forest of broad beans that we are picking while still green, small and delicious. Fried with bacon and served on sour dough bread, they made a tasty Sunday dinner.

broad beans on the plant

Saturday the salad was from the garden using the pea tops, which we need to pick almost every day at the moment to keep on top of them. I have planted corn between the rows so that as the peas finish, the corn will take over and we will be eating corn fresh from the garden in February - if they grow well. The mandarins came off the tree in the citrus grove. The snapper came from out in the bay.

snapper and salad

I have a future aim to be able to make a salad without a dressing using mustard leaves that taste of mustard and garlic tops to give a garlic flavour. Rocket could provide the peppery note. But my mustard is still growing so I dressed this salad with a honey dressing - 1/4 cup extra virgin olive oil, 2 tablespoons rice vinegar, 1 teaspoon of dijon mustard and 1 tablespoon of honey. Mixed well together it worked nicely with the mandarins and pea shoots.

Tuesday, October 24, 2017

Planting for winter crops - New Zealand Christmas problems

The year round vegetable garden is something I am still learning to master. There is a big difference between planting all year round and harvesting all year round.

Year one on the lifestyle block I planted more vegetables after the main late summer harvest. It was too late they were great come late spring and early summer but over winter they were too small.
The winter mesclun was a hit though.

Year two, I planted early in February. Towards the end of winter and into early spring we have had some lovely leeks. But it was still too late. The red cabbages are not ready yet and there are still leeks in the garden.

Then I learnt that to be successful in the year round harvesting garden, winter crops need to be planted alongside the summer crops in spring and in early summer. Reading a Northern Hemisphere gardening blog recommended to me, the writer talked about planting mid June to mid July. When is the equivalent in our Southern Hemisphere seasons?  You guessed it mid December to mid January. Just the time when we are busy getting ready for Christmas, enjoying Christmas and New Year or taking a holiday away. No wonder that all year round garden seems challenging.

This year I have my root vegetables of carrots and parsnips in on the spring planting. Hopefully they will not get eaten when they are teeny and vulnerable. I plan to plant brussel sprouts, cabbages, leeks and cauliflowers in the mid December to mid January window. The brussel sprouts seeds are just starting to sprout in the pots.

Each year my aim is to produce more vegetables in quantity and variety and at more times during the year. Learning new skills takes time and practice.

Tuesday, October 17, 2017

Peas for self sufficiency

This year I understand better the position of peas in the self sufficient garden.
I am not growing them for year round freezing or bagfuls. I am growing them as the sweet vegetable that will fill the gap, while my spring vegetables are growing and before the summer harvest begins.
The plan is to plant peas for trimming the tops as salad greens, sugar snaps for use with the whole pea pod and then because we have the space, I have planted some peas that you do pod - for sweet treats.
I planted the peas for trimming and the sugar snaps about a month ago but made the mistake of not covering them. Very few have survived. I think the birds enjoyed some tasty snacks.
I replanted and covered them. Now I have plants!
The peas planted for trimming were microgreen peas fiji feathers from King Seeds.
I trimmed them two days ago and then trimmed them again tonight for dinner for four. If you let them grow too much they get tougher. I will probably need to trim them every day or every second day to keep to the yummy tender shoots and leaves. They do taste just like peas.

At the end of the microgreens are planted the sugar snap peas. I chose this variety because of the comment "excellent eating quality." They sounded tasty. I was concerned they might get trimmed as microgreens by accident but the advantage of the fiji feathers is they look completely different to the sugar snaps. If all goes to plan, early November we should be using these pods in our cooking.

My peas for podding are the peas alderman. I have grown these the previous two years and they are delicious. Very few make it anywhere near the kitchen. They get eaten in the garden and that is a yummy way to enjoy some peas. They should follow on from the sugar snaps.

Peas are also nitrogen fixing. Once the peas have finished, if I dig them into the soil, they will also enhance the nitrogen content of the soil for future plants to use. The peas will keep giving us more vegetables.

Thursday, June 1, 2017

The beautiful commute

People ask me how the daily commute is and I say... it's beautiful.
To prove it, I started taking a photograph on my phone every morning on the commute into Nelson from the Lower Moutere.
The photographs were taken between April 2016 and April 2017. They are not every work day because sometimes I was doing the driving or off holidaying and it still beautiful everyday.


Sunday, May 14, 2017

Feijoa jelly single variety experiment

I hadn't thought about the variety of feijoas we had growing until I was told about this helpful guide with photographs and tasting notes from Country Trading: get to know the feijoa.
We scooped our way through quite a number of feijoas trying to identify our varieties. We combined the images and tasting notes from the page above, with the excellent variety photographs at Waimea Nurseries,
This got me thinking, if feijoas have different levels of sugar affecting their sweetness, do they have different levels of pectin too? Pectin is the substance that in the right pH conditions (hence the lemon juice) forms the structure to make feijoa jelly set.
In previous year's my feijoa jelly has set as quite a stiff jelly but my last batch, while a different recipe, was not as well set. I began to wonder if the variety of feijoa had caused this difference in setting thickness. Perhaps one variety is particularly good for jelly.
Let the single variety feijoa jelly setting test begin!

I made the same basic feijoa jelly recipe for all five varieties.
1. Feijoas sliced and boiled in enough water to keep them covered until soft.
2. Fruit and liquid strained through muslin.
3. One cup of sugar, plus a teaspoon of lemon was added for every 500ml of fruit liquid.
4. The jelly was boiled until it reached 105C and poured into sterilised jars.
The feijoa jelly production line was set up with pots being cleaned between each variety to stop carryover.

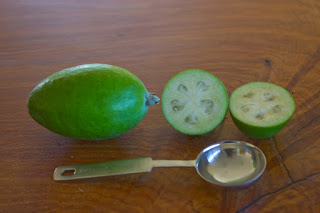
One aspect that is hard to tell from the Country Trading images is size. I have added a tablespoon for size in my images below.
Feijoa variety one - believed to be Unique variety


Feijoa variety two - identified as Anatoki variety


Feijoa variety three believed to be Pounamu variety


Feijoa variety four identified as Apollo variety


Feijoa variety five believed to be Keiteri variety


Results
I waited until the following day and the best set jelly was variety one, believed to be unique variety. The second best was variety three believed to be pounamu variety, though anatoki (variety two) was also pretty good. 

Conclusions
But like any decent experiment one needs to say; more needs to be done in this field of research. My varieties 4 and 5 have become dessert syrup. I wonder if this may be because I let the fruit boil for too long before straining it due to my production line of jelly making. I may have broken down the pectin. I really needed to boil them for a set length time each so this was controlled. 
I also think ripeness was probably a factor. As fruit ripens, the pectin is broken down, so very ripe fruit has less pectin. Variety one and two had fruit that was less ripe than the other varieties and variety four, identified as apollo, were the most ripe to over ripe.
When making feijoa jelly in future, I think it is a good idea to think about the variety being used as its sweetness and pectin levels probably do mean differing amounts of sugar and lemon juice need to be added.
In other features, the nicest golden colour jelly was variety three, believed to be pounamu. The results on which one tasted the best? It is feijoa jelly - they are all delicious!

Note: Initially when identifying the feijoas we had thought it the number of seed pockets in the cut fruit were important. However for the jelly experiment, I collected the feijoas from the different bushes in different containers. We found the following in one container - five, three and four seed pockets. I believe these are all anatoki variety.


Note: Many feijoas were eaten during this experiment and the different varieties definitely do have their own individual flavour.

Happy to have the above feijoas better identified, if they are incorrectly labelled.


5 Favourite Sights Seen

  • 1996 Watching tropical lightning turn night to day, outside a little wooden church in a small village in Sabah.
  • 2004 Flying down the Rainbow Valley at 8000ft in a cessna on a clear blue day.
  • 2003 Seeing and hearing Michael Schmacher rolling out of the pit garage in his Ferrari in Hungary.
  • 2009 Chancing upon 100 or more dolphins just off the Kaikoura Coast swimming around, jumping out of the water, doing somersaults and generally having fun.
  • 2006 Finding a pool at the bottom of a waterfall in the bush at Kaikoura that was full of playing baby seals.